There is a particular kind of frustration that comes from a kitchen cabinet door that does not sit right. It might be slightly higher on one side, or it rubs against the neighbouring door, or it simply does not close flush with the frame. Most of the time, the problem is not the door itself – it is the hinge, and more specifically, it is a hinge that has not been adjusted correctly.
This is exactly the problem that 3D hinges were designed to solve. Unlike traditional hinges that are fixed in place once installed, 3D hinges allow you to make precise adjustments in three directions after the door is already hung. You do not need to remove the door, re-drill holes, or call a carpenter. A screwdriver and two minutes is usually all it takes.
Sterling’s SterlingWP range of 3D hinges is built for exactly this kind of flexibility. Whether you are fitting a new modular kitchen or correcting alignment issues in an existing one, understanding how these hinges work – and how to adjust them properly – makes a significant difference to the final result.
What Makes 3D Hinges Different from Normal Hinges
A normal hinge has one job – it connects the door to the cabinet frame and allows it to swing open and shut. Once it is screwed in, that is it. If the door is misaligned, you have to unscrew the hinge, reposition it, and hope the new screw holes hold firmly. It is time-consuming and often leaves the cabinet frame with weakened fixing points.
A 2D hinge is a step up from normal hinges – it allows adjustment in two directions, typically height and side-to-side. But it still cannot correct depth, which means if the door is sitting too far in or too far out relative to the cabinet face, a 2D hinge cannot fix it.
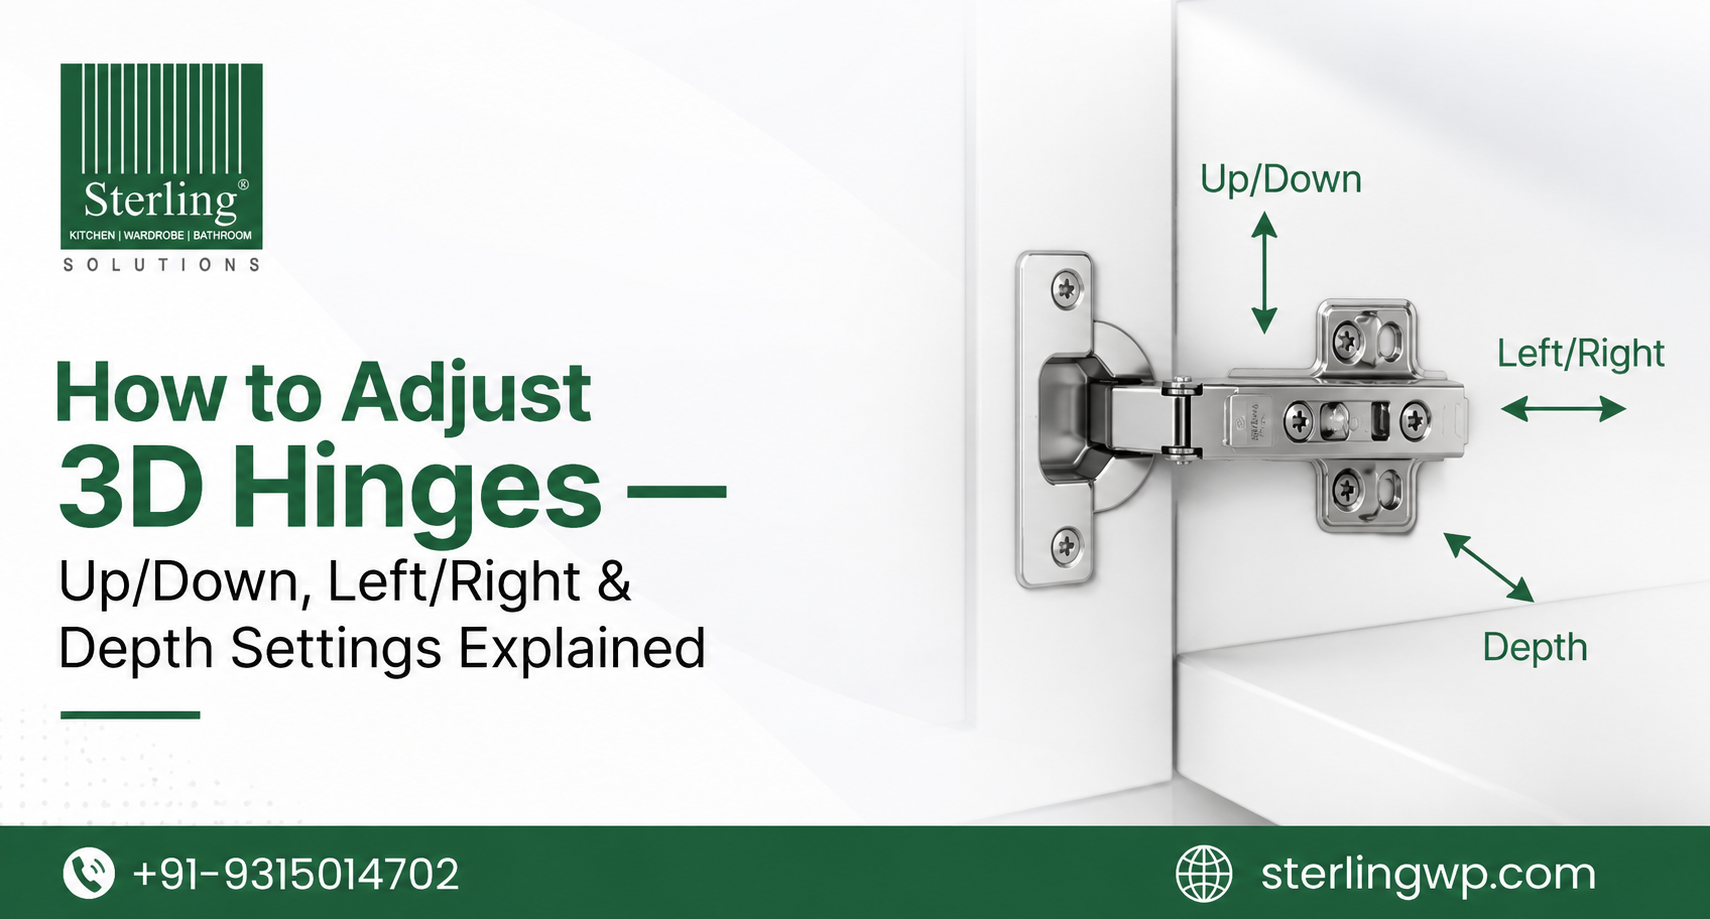
3D hinges, as the name suggests, allow adjustment across all three axes – height (up and down), lateral position (left and right), and depth (in and out). This three-axis control means that virtually any alignment issue can be corrected without touching the screws that fix the hinge to the cabinet or the door.
Sterling hinges in the 3D category are designed with clearly marked adjustment points for each axis, which makes the process straightforward even for someone who has never adjusted a hinge before.
Understanding the Three Adjustment Points
Before getting into the step-by-step process, it helps to understand what each adjustment actually does to the door.
The height adjustment moves the door up or down relative to the cabinet frame. This is the most commonly needed adjustment, particularly after a kitchen has been installed and the doors have settled slightly over the first few weeks of use.
The lateral adjustment moves the door left or right. This is used to close gaps between adjacent doors, to centre a door within its opening, or to prevent two doors from rubbing against each other when opened simultaneously.
The depth adjustment moves the door forward or backward – closer to or further from the cabinet face. This is important for achieving a flush finish across a row of cabinets, especially when the cabinet frames are not perfectly aligned with each other.
Tools You Need
The good news is that adjusting 3D hinges requires almost nothing in the way of tools. A standard Phillips head screwdriver is sufficient for most adjustments. Some hinge designs use a flat head screwdriver for specific adjustment screws. Sterling’s 3D hinges are designed to work with a standard screwdriver, so there is no need for specialist tools.
How to Adjust the Height – Up and Down
The height adjustment screw on a 3D hinge is typically located on the hinge arm, which is the part that connects the cup – the circular piece pressed into the door – to the mounting plate fixed to the cabinet frame.
To move the door upward, turn the height adjustment screw clockwise. To move it downward, turn it anticlockwise. Each full turn of the screw moves the door by approximately one millimetre, so adjustments are precise and easy to control.
The practical method is to open the door slightly, make a quarter turn of the screw, then close the door and check the alignment against the adjacent door or the cabinet frame. Repeat until the height is correct. On a standard kitchen cabinet door, you will typically need to adjust both hinges – the top and the bottom – by the same amount to keep the door level.
One common mistake is adjusting only one hinge when the door appears to be twisted rather than simply high or low. If the top of the door is too high and the bottom is correctly positioned, adjusting the top hinge down while leaving the bottom hinge untouched will correct the twist.
How to Adjust the Lateral Position – Left and Right
The lateral adjustment screw is usually located on the mounting plate – the piece that is fixed to the inside of the cabinet frame. On Sterling’s 3D hinges, this screw is clearly positioned and marked separately from the fixing screws so there is no confusion about which one to turn.
Turning the lateral screw moves the entire door left or right. This is the adjustment to use when there is an uneven gap between two adjacent doors, or when a door is sitting too close to the cabinet side panel.
The same quarter-turn-and-check method works well here. Make a small adjustment, close the door, and assess the gap from the front. Continue until the gap is even on both sides. For a pair of doors on the same cabinet, adjusting one door toward the other will naturally close the gap between them.
How to Adjust the Depth – In and Out
The depth adjustment is the one that most people overlook, but it is critical for achieving a clean, professional finish across an entire kitchen. If one door sits slightly further forward than its neighbours, it catches the eye immediately even if the height and lateral alignment are perfect.
The depth screw is typically located at the point where the hinge arm connects to the mounting plate. Turning it in one direction pushes the door forward – away from the cabinet – and turning it in the other direction pulls it back in.
This adjustment is particularly useful when fitting doors on cabinets that are not perfectly flush with each other, which is a common situation in kitchens where the wall is not entirely flat. Sterling’s 3D hinges provide enough depth adjustment range to compensate for most real-world installation irregularities without requiring the cabinet frame to be repositioned.
Corner Hinges and Special Configurations
Not all kitchen cabinets use standard straight hinge configurations. Corner hinges are used in situations where two cabinet doors meet at a corner, typically in L-shaped or U-shaped kitchens. These hinges allow both doors to open without colliding with each other and are adjusted using the same three-axis system as standard 3D hinges.
Sterling’s corner hinge range follows the same adjustment logic, so once you are comfortable adjusting a standard 3D hinge, working with corner hinges feels familiar. The depth adjustment is particularly important in corner configurations because the two doors need to sit at the same depth to create a clean visual line across the corner junction.
Choosing the Right Finish for Your Kitchen
Sterling’s 3D hinge range is available in several finishes to suit different kitchen styles. The standard finish is a brushed nickel or chrome that suits most contemporary modular kitchens. For darker kitchen designs, black hinges — sometimes referred to as hinges black or dark hinges in finish catalogues — provide a sharp contrast against light cabinet colours and a seamless look against dark ones.
MS hinges in the SterlingWP range offer a cost-effective option for projects where budget is a consideration, while SS hydraulic hinges are the premium choice for kitchens that require both smooth soft-close operation and superior corrosion resistance. The SS hydraulic hinge combines the three-axis adjustability of a standard 3D hinge with a built-in damping mechanism that controls the closing speed of the door.
Common Mistakes to Avoid When Adjusting 3D Hinges
Overtightening the adjustment screws is the most frequent error. These screws are designed to be turned gently – applying too much force can strip the thread and permanently damage the adjustment mechanism. Always use light, controlled turns and check the result after each small adjustment.
Another common mistake is adjusting all the hinges on a door simultaneously. The better approach is to identify which specific adjustment is needed – height, lateral, or depth – and address that one axis at a time. Changing multiple adjustments at once makes it very difficult to identify which change produced which result.
Finally, always check the door alignment with the door fully closed. The gap between the door and the frame looks different when the door is open, and making adjustments based on an open door position will produce inaccurate results.
Frequently Asked Questions
What is the main difference between 2D hinges and 3D hinges?
A 2D hinge allows adjustment in two directions — typically height and lateral position. A 3D hinge adds depth adjustment as the third axis, which means you can correct a door that sits too far in or out relative to the cabinet face. For modular kitchens where a flush finish is important, 3D hinges are the more capable option.
Can I adjust Sterling 3D hinges without removing the cabinet door?
Yes. All three adjustments – height, lateral, and depth – can be made with the door in place. This is one of the primary advantages of 3D hinges over normal hinges, which require the door to be removed and rehung to correct alignment.
Are SS hydraulic hinges adjustable in the same way as standard 3D hinges?
Yes. Sterling’s SS hydraulic hinges include the same three-axis adjustment system as the standard 3D hinge range. The hydraulic damping mechanism is separate from the adjustment function, so the soft-close behaviour is not affected by making positional adjustments.
How much adjustment range do Sterling 3D hinges offer?
Sterling’s 3D hinges offer approximately two millimetres of adjustment in each direction per full screw turn, with a total range of around plus or minus two millimetres on each axis. This is sufficient to correct the vast majority of alignment issues encountered in standard modular kitchen installations.
Are black hinges available in the 3D adjustable format?
Yes. Sterling’s SterlingWP range includes black hinges in the 3D adjustable format, suitable for contemporary kitchen designs that use dark hardware finishes. The adjustment mechanism functions identically to the standard finish variants.
What should I do if the adjustment screw does not seem to be moving the door?
First, check that you are turning the correct screw – adjustment screws are separate from the fixing screws that hold the hinge to the cabinet. If the correct screw is being turned but the door is not moving, check whether the fixing screws are too tight, as overtightened fixing screws can prevent the adjustment mechanism from functioning. Loosen the fixing screws slightly, make the adjustment, then re-tighten them.
Final Thoughts
A well-aligned kitchen door is one of those details that most people do not consciously notice — but everyone notices when it is wrong. The 3D hinge makes correct alignment achievable without specialist skills or tools, and it keeps the door adjustable for the life of the kitchen.
Sterling’s SterlingWP range of 3D hinges is built with the precision and durability that a working kitchen demands. Whether you are fitting a new kitchen from scratch or correcting alignment on an existing installation, the right hinge makes the entire process significantly easier. Explore the full hinge range at sterlingwp.com and find the right fit for your kitchen.